Sunday, October 6, 2013

Mission Accomplished

Well, the "caterpillar" nap roll/play mat is done.  I altered a bit from the original with the blanket not being attached to the bolster roll with velcro, no pom-pom trim for caterpillar legs and replaced the ribbon ties with elastic straps for the purpose of safety.  When I went looking for supplies to make the face, I lucked out in finding the felt buttons, hearts and flowers.  They worked perfectly and are safer for a toddler than buttons.


The quilt pattern for the blanket is "Zig Zag Love" which I found on the Craftsy website.  The original size was 25" x 21 1/2".  Not sure of the exact size mine wound up but I adjusted it to fit my purposes.

I will be making another (not right away) for my other granddaughter.  That one will be a ruffled quilt, another design that just screams "caterpillar".

Thursday, September 26, 2013

Fall Tablerunner

Like I said, my purse projects keep getting interrupted everytime I go into my sewing center.  This is a 10 Minute Table Runner from Missouri Star Quilt Company.  My sewing center put together kits with fabric, batting, and binding all included.  I added the machine embroidery for embellishment.

Pittsburgh Sports Team Wallhanging

This was another class offered by my sewing center.  The provided the embroidery designs for the borders.  The design was from a log cabin Christmas Wreath pattern, modified somewhat.  The class was two sessions with homework in between.

Another Purse

I have been collecting purse patterns and I am behind in making them.  Every time I go to my sewing center I find another project to work on.  I did find some time to squeeze this purse in though.  The pattern is from Indygo Junction with a modification from the magazine Designs in Machine Embroidery.  The modification had some machine embroidery in the center panel and a curved notch in the top band of the purse.  I had every intention of following the plan until I settled on fabrics.  I decided to use old blue jeans with some linen fabric, sort of a shabby chic look.

When I settled on a thin jeweled trim for the center seam lines it gave me the idea of making that center panel into a zippered pocket - with a jeweled zipper.  I found zippers online with swarovski crystals.  They had black zipper tape so the looked great.  The only problem is I couldn't operate them once I have the pocket assembled.  The crystal zipper teeth kept standing out, making it difficult to open and close the zipper.  Had to rip them out add regular zippers, a big disappointment.

The handle tab connectors were done in the hoop on my embroidery machine with the design coming from a Nancy Zeiman collection for purses.  Overall I am happy with the outcome even though I am disappointed in not being able to have bling zippers.  My plan is to add some bling zipper pulls.

Sewing up a Storm

I sure am making up for lost sewing time this summer.  I continued work on a nap roll for my grand daughter after almost giving up on it, or at least this design.  The heart design with secondary patterns of diamonds and zig-zag was perfect for a caterpillar.  It was tedious work piecing it together and I almost gave up several time.  And the thought of matching all of those points and angles was giving me cold sweats.  Leaving it set over the summer was probably a good thing, I wasn't even pinning by the time I finished the assembly.  Below is a pic, still in progress.

The inspiration for this came from a similar project I created for my daughter when she was little.  She was attached to it and asked me to repair it for her a few years ago.  It was in such bad shape I had no choice but to completely remake it.  She was mortified when she saw it in pieces.  It was an old pattern, McCalls I think and it was made to look like a caterpillar.  I've searched the internet hoping to find someone with a copy of sale but no luck.
Here's a pic of the face on the old one.  As you can see it shows it's age.

This is the remake.  I made a new body or pillow roll but kept the original blanket that wraps around and made fabric ribbon ties to replace the ribbon.  The only thing I didn't do was reattach the blanket to the pillow with velcro like the original.  It's just wrapped and tied.  This is my goal for the one I am currently working on.


Sunday, September 8, 2013

Block of the Month Project

This is another class project from Craftsy. Every month instructions for a block are available on the class website.  I have to say this class has been challenging and I learned alot.  Normally I would shy away from some of these blocks because they are more advanced, lots of points and matching.  The instructor gave her methods for simplifying the process.  There were some issues with the printed instructions not giving the correct measurements (since corrected) which was very frustrating.  The class isn't finished yet but I wanted to finish it up so I can move onto other projects.  All of the big blocks were complete and all that was left was the flying geese and half square triangles.
I didn't need the class for that so I jumped ahead and then assembled the quilt.  All that's left is more half square triangles for the border and then assembling the quilt.  I may do some machine embroidery embellishment as I am quilting.  Seeing the whole thing assembled, I think it would make a nice Christmas Quilt.  Maybe substitute poinsettias for the flowers in the basket, add a bow to the "wreath", give me some time and I will come up with other ideas. The class is free on Craftsy, you can download the class materials & instructions and have access to the class video anytime. 

Getting back into the Sewing


It's been a long summer.  My husband & I work with youth track and field locally and the USATF Junior Olympic Program nationally.  Our local meets begin in May and the National Junior Olympic Championship is at the end of July.  We treated ourselves to a restful and enjoyable family vacation deep in the "wilderness" in northern Minnesota.  This cabin was our home for a week, if not just to rest our heads at night and cook some food.  The majority of our time was spent on the lake fishing.   Fishing was slow but steady.  By midweek we finally had enough walleye for a fish-fry.  We caught more, but Lake Kabetogama has a slot size for keeping walleye.  You can keep anything up to 16" or over 30" but you have to throw back anything in-between, and yes we did throw some back.  Ready to get back into sewing.


Monday, April 29, 2013

Mannequin Pincushion

I never realized how many different pin cushion ideas and patterns there are out there.  There are a number of them pinned on my Pinterest board for future projects.  Most of them will just be decorations for my sewing room.

The mannequin pincushion just had to be made.  I love the soft sculpted dolls and this falls right in line.  Found a free online tutorial from DIYDISH.  A remnant or fat quarter of fabric is all the fabric you need.
I can see a few more of these in my future, maybe some holiday themed ones.


Stupendous Stitching

Another online class from Craftsy.  I am really enjoying these classes.  You purchase the class and then you have them in your inventory to use whenever you want, there is no expiration on the time the video is available to you.

The class was taught by Carol Ann Waugh.  Visit her website for some inspiration.

This was a fun class and I plan to do more projects using what I learned.  Before even starting this project, you need to make a "Stitch Bible", a fabric book with samples of all of the decorative stitches on your machine.  Samples are done in default or normal mode, and then varying width and length.  Sometimes there's a difference in the way a stitch is depicted in the chart of stitches that came with your machine and how they stitch out.  Making this book gives you a good reference to select the right stitches for the look you want.

Start with a piece of fabric, preferably the size of a fat quarter.  Choose yarns, cords, and other items to "couch" over (zig zag stitch), then mirror those couching lines with different decorative stitches from your sewing machine and finish up with some hand embroidery to fill in empty spots.
Piece with couching lines and machine decorative stitches.

Piece with hand embroidery added.

You will love Carol Ann's one rule - There are no rules!  There are no Mistakes!

Chain of Stars Mystery Quilt

This project was a project from an online class on Craftsy.  Directions for each set of blocks was given in a separate clue with the layout instructions in the final clue.  There were a several suggested fabric choices and I chose the traditional option.  The fabrics main fabrics were from the Coventry Court collection by Robert Kauffman with other complimenting fabrics.  Initially I was going to make the wall hanging size but changed to the double/queen because I liked the overall pattern better.
Only the quilt top is completed. While I loved the fabric, it doesn't really match the decor in any of my rooms so it will remain in this stage until I find a home for it.  As you can see, my new design wall is being put to good use.

Baby Quilt

Seem to be making a number of baby quilts lately.  This one is for my new grand-daughter due in June.  The pattern is a Disappearing Nine-Patch.  Missouri Star Quilt Company has a free tutorial on this easy quilt.  The fabric used was Happy Pink Charm Pack by Dena Designs for Free Spirit Fabrics.
I quilted free-motion on my Baby-Lock Elissimo, my first "real" free motion project.  I used a loopy line, alternating loops and hearts.  I am happy with the result but know I still have need some practice.

Interchangeable Bag

Ellen Medlock's Interchangeable Bag 2 was a fun and easy bag to make.  The purse fabric slides on the metal rods of the frame and can be taken off and interchanged with another of the same purse.  I am already plotting my conversion options for it.

his version was made with an upholstery fabric remnant.  
I used the wrong side for the bag sides and top ruffle  
Embellished with a fabric flower, beads and trim.

Inside of bag.  Doesuede remnant used for lining.

Counting Critters Quiet Book

I made this fun Quiet Counting Book from Amazing Designs, done in the hoop on an embroidery machine.  I bought the software design and kit from Nancy's Notions.  The kit included all of the fabric for the animals and enough canvas for one book.  There is enough of the other fabrics to make several other books.

I think I used almost every thread color I have.  They were all lined up on my table until I was finished with the book.  It didn't make any sense to put them away after one page when I was going to be using them again for another page.

Carolina Carryall

I am really into making purses and bags.  I have a number of patterns lined up to make.  This one is the Carolina Carryall, made in batik, by Studio Kat Designs.  The bag has a "secret pocket" between the bag and lining.  Another project will be making the Encore Purse Insert to go with it.

Secret pocket - hope you can make it out from this pic


Inside of bag - doesn't have pockets but will be making the Encore Purse Insert to go inside.

Room With a View


It's been over a month since I've posted here.  It's amazing how inspired and motivated I am in my new room.  I have a closet, daylight, sunshine, open windows, and typical neighborhood sounds of kids playing, dogs barking, birds singing.  By the way, did I mention I have a closet?  This is definitely a step up from my basement "dungeon".

I did add a design wall for quilting projects and it's also handy for pics of other projects.  There's a tutorial on making a design wall on The Quilting Edge Blog.

Stand by for additional posts of projects I've done since my last posting.

Sunday, March 17, 2013

Love of Sewing Retreat

Just spent three inspiring days at the Love of Sewing Retreat with Nancy Zeiman & Babylock hosted by my local sewing center.  Nancy Zeiman presented many great patterns, ideas & tips and she wowed everyone with her landscape quilting.  Babylock educators gave us three hands-on sewing classes with projects to take home.  I came home loaded with prospective new projects and I promise to finish them all.  Below are some photos and descriptions of the projects we made.

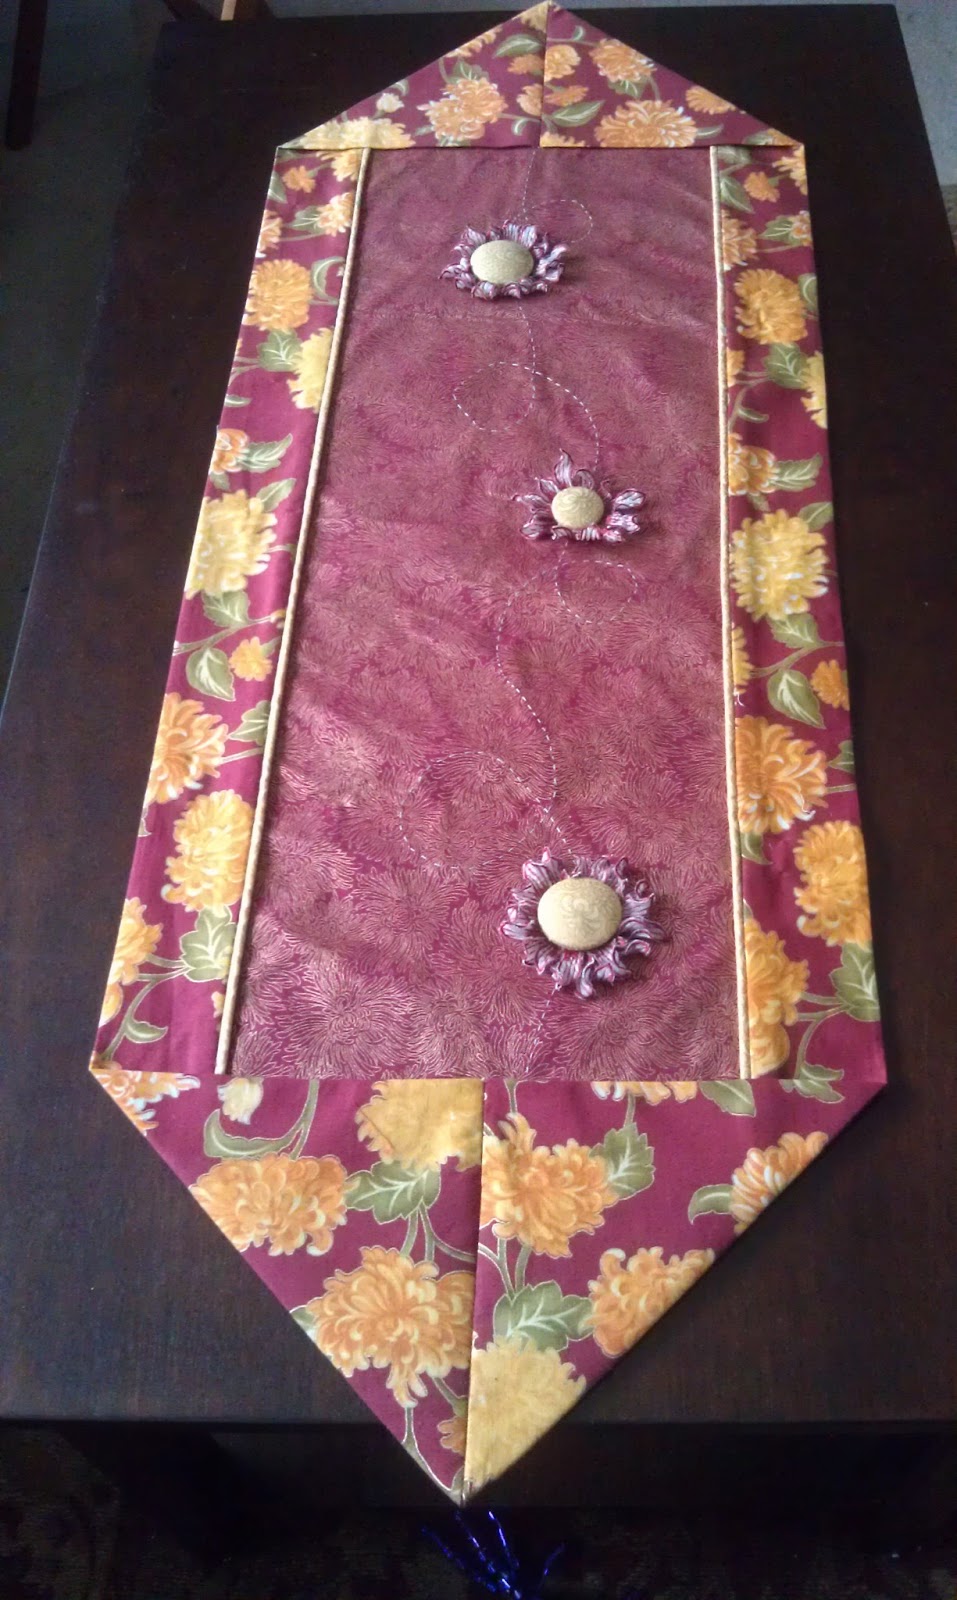
My first class was a Sashiko Table Runner.  The pattern for the runner is "The 10 Minute Table Runner" and can be found on various websites.  

We made flowers on an embroidery machine with texture magic 
sandwiched between two layers of organza.  

While the flowers were stitching in the embroidery machine, we moved to a Babylock Sashiko machine and sewed some meandering lines down the length of the fabric.  
You can see the sashiko stitching on the photo above.  

Next step was to add piping to each long side, sew sides together and finish ends.  The flowers were cut out close to the stitching and then steamed so they would crinkle.  Two layers of the flower were attached to a covered button and attached to the table runner.

My next project was a Card or Note Holder Board.  All of the sewing was done on  a Babylock Evolution Serger.  We made belt loops  with the belt loop attachment and they were a lot of fun to make.  The board has a nice print in the center with Peltex sandwiched in-between for stability.
The edges are finished with a wave stitch.  
Finishing touches are the buttons and a fabric rose, also made on the serger.

My last project was a small clutch or cosmetic bag made entirely in the hoop
on a Babylock Elissimo, and that includes the zipper!!
Making cathedral windows in the hoop, how great is that! 

Progress in the hoop.

Finished Bag

Under flap, zipper open.

Under flap, zipper closed.

Now that I put the finishing touches on these projects, I'm ready to get started on some new projects with my new found inspiration.


Friday, March 15, 2013

New Bag

Well, I finished my new bag last week in time for our trip to the DC area for the weekend.
Here's the bag front.  This bag is made from Alova fabric and other doeskin type fabrics.  I wanted a more purse like look to it as opposed to the batik fabric I used the last time.  This time I used Soft and Stable byAnnie instead of Decor Bond or Peltex for interfacing/stabilizer and I love the result.  I also interfaced the fabric with a tricot fusible interfacing.  The Soft and Stable supports the bag, keeping shape, but yet soft and pliable, rather than the stiffness of the Peltex.  

Bag back

Inside pouches & pockets

Friday, March 1, 2013

Scissors Holder

Still working on my new bag, but took a detour and made a scissors holder for my bling lanyard.  This one will do for now, but I plan to make another with some embroidery on the front panel

I made it without a pattern but I got the idea for it from a Pinterest post, repinned by me.  It was posted on a blog, but everything was in French and none of the images displayed on my computer.  
.

Thursday, February 28, 2013

It's Beginning to Look Like a Sewing Room!

 I was tired of my dull dreary basement sewing room.  The room was odd shaped and difficult to make an efficient work area.  I purchased a new Elissimo Gold a year ago to add to my Babylock Elizabeth and Babylock serger.  My room was cluttered, I know what's new for a sewing room, but I didn't have any efficient method of storing my fabric and it was impossible to fit any more furniture into the room.  Hence my decision to move the room upstairs (2nd floor) to a spare bedroom, can you say empty nest :)  It's been a real chore hauling everything up two flights of stairs but things are beginning to take shape.  So much so that I decided to take a break from moving and organizing and start on my first project in my new room.


As you can see, I now have windows with daylight!  This is the Babylock Elizabeth, the machine I use for most of my basic sewing. 


I have an old chest with a 6' board on top for my cutting/layout area and the work-space for my Elissimo Gold butts up against it for extra layout space if needed.  It also give me extra table-space when I am quilting project.

An this is my closet.  Not totally organized yet, but it's much better than what I had.  Thanks to the blogs that gave me the idea of using comic book backing for mini-bolts for storing my fabric.  It is so efficient and it's nice to be able to look at the fabrics for inspiration.  I had to put in another order, one package wasn't enough.  

You are probably wondering what project I am working on, it's the Professional Tote from The Creative Thimble.  This is the third one for me.  I made one for my Alaskan Cruise in September and the other I made for our "cruise director", a friend who helped us newbie cruisers learn all about cruising.  Both of those bags were made with batik fabrics.  This new one will be black so it can easily be used for everyday.  


Front zipper pocket and side pockets for water bottles or compact umbrellas.

Back snap pocket and travel strap to attach to luggage handle when travelling.
The inside has a center zippered pouch that's just the right size for an iPad and pouches on both the front and back on the inside.  I can honestly say this is the first purse I've had where I can reach in without looking and pull out exactly what I want.  I was never a fan of big purses, but I love this one!!